Pages

Monday, December 24, 2012

Happy Holidays!


I know I've been a little light on posts lately - been busy with cookies most of the month...

...lots of cookie platters...


...and cookie gift boxes...
 
 
...and cookie favors...
 
 
...and other cookies like Snickerdoodles, Merengues, Pecan Tassies, Chocolate Chip, Peanut Butter Kisses, Gingerbread, Gingerbread Houses, and even Pumpkin Treats for the dog (her fave)...
 
...and braving the grocery store for Christmas dinner fixins...
 
...and finding time to squeeze in some Christmas shopping here and there...
 
...and in the midst of all the running around this time of year, it's time for some quality family time...
 
...and to send a prayer for those whose year may have held sadness through loss or tragedy...
 
...and to count our own blessings...
 
Wishing you Peace and Happiness during the Holidays and throughout the New Year!


Monday, December 17, 2012

Wednesday, November 28, 2012

Stamp of Approval?


A long, long time ago (ok, about 2 years ago) I was a stamper.  Making cards.  Lots of them.  With the bajillion stamp sets I had accumulated over time.  I love making cards, always have.  But a million paper cuts later I decided that I didn't want to do it in volume anymore, and I found a sweeter hobby - baking.  To make room for all of my new baking toys (yes, I said it!) I knew that I had to scale down the stamps.  A lot.  Almost all of it.  Some of it left home via garage sale, some via cookie friends (Anita...Jackie...) and most of the rest are sadly sitting on eBay right now.  But some are sitting with my baking toys... clear stamps that have been said to be ok for use on food...(brand new, never been used ones, of course...)
 
I just happened to have some white-iced cookies laying around, you know the ones... they are so old you wouldn't consider them food anymore, but they are perfect for playing & trying new things... and with food coloring as the paint I was ready to go play!
 
I didn't have any luck getting regular Amerigel to work but I have read about others using airbrush colors on stamp pads to get the job done.  Well, for all of my stamp supplies, I did not have a new, uninked stamp pad laying around so I just painted the color on new, unused clear stamps with a paintbrush.  First I stamped it on some paper to a) make sure it worked, and b) to get the excess color off.  Then, I stamped the cookie - not too shabby!  The clear stamps are nice, because you can see exactly where it is going on your cookie.  (You can see I had to fit the stamp to the cookie, since I didn't make the cookie to fit the stamp... and being able to see where you are stamping is a tremendous benefit!)


Then for fun, I used icing to go over the stamped images and add accents.  My 15 year old daughter prefers the stamp-only-vintage look (the one at the top pf the post) but I kinda like them with icing too.


I tried some other stamps but apparently not all are created equal - on some the color just pooled around the stamp.  One of these days I will play around some more & see if I can figure it out.


So, does cookie stamping get my stamp of approval?  Maybe... the jury is still out on that one...
 
 
Before I go, I must send a shout-out to Barbara (lov2bake)
I thought of you the whole time I was doing these!
 
Happy Stamping!


Thursday, November 22, 2012

Happy Thanksgiving!


I hope everyone had a safe and happy
Thanksgiving,
and that you were able to take some time
to reflect on all there is to be thankful for...
Enjoy the holiday!


Tuesday, November 6, 2012

Election Day 2012


I pray that whatever choice America makes today
that it is the right one!


Thursday, November 1, 2012

Corny, I know...


Hope everyone had a safe and happy Halloween!
 
(...and lots of prayers for those affected by Sandy...)


Sunday, October 28, 2012

A Pressing Matter...


***************
 
 
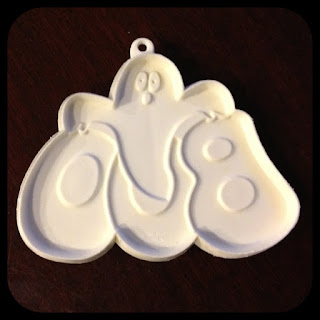
Once again, I had purchased another plastic impression cutter that looked too cool to pass up.  The ebay app for iPad makes it just too easy to make quick purchases.  Without giving myself time to think twice.  Whether or not it was deep enough for my 3/8" thick dough.  Which it wasn't...


***************
 

So rather than just admire the cutter taking up space, or roll my dough thinner (gasp...never!), I forged ahead and, although not my method of choice, pressed the cutter down into the dough to make an impression and then hand cut them.  Make sure to press enough to get all of the details.  A little time consuming, but really, I had no choice.  If the shape was a little more geometric, I could have used a square or round cutter, but apparently that's something else I overlooked in my haste...  Hand-cut dough isn't as pretty or clean but as you can see in the bottom right picture, the baked cookies don't look too shabby!  I also sometimes do this with regular (not impression) cutters - like letters.  Cut squares, circles, whatever shape you like, then take your cutter & gently impress it into the dough, cutting maybe 1/3 of the way into the dough, and it will leave an impression for you to decorate over after baked.  Or you can use it for cutters like, say, giraffes, that tend to break at the neck - simply impress them onto maybe a rectangle & ice the background in a solid color around the giraffe. 


*************
 
 
And the impression stayed nice and clean so that I could outline the sections before decorating.  Don't add small details like the eyes and mouth before flooding - they will get lost.  They are easy enough to add later.  (Although I guess I should have peeked at the cutter 'cause I did my mouth a little differently... oh well, no biggie : )  Depending on the size of the areas you will be icing, you may want your icing a little bit thinner for flooding.  These were a pretty good size so I was lucky : )  You may also want to outline again after flooding, like if you go over your outlines a little... like I did... Luckily they cleaned up nice : )


************
 
BOO! 
 
 
HAPPY HALLOWEEN!


Tuesday, October 16, 2012

Sweets for my Sweet


Well, it's time again for another Hallmark Holiday.  "Sweetest Day."  Not that I have anything against professing my love to my husband (love you honey!) but after all, Valentine's Day is less than four months away...  Anyway, since Sweetest Day is Saturday, I thought I'd give my sweet a box of chocolates.  But, instead of buying a box, a box that probably consists of at least half of those really yucky ones, I figured I'd make a box of cookie chocolates : )  I usually do these with chocolate fondant (candy clay) but I was too lazy busy to make any.  They are really fun to do, and boy are they yuuummmyyy!
 
*****
 
First, bake up a batch of LilaLoa's End-All for Chocolate Cookies, cut in candy-box-candy shapes (squares, circles, rectangles.)  Sure, you could use any old chocolate cookie recipe, but since she was so kind wonderful  unbelievably selfless to share hers, why wouldn't you?  They are soooo good!  I mean, the name says it all! (I think she did something similar to these a while back... but I think she iced in actual chocolate, which is also really good!)

 
 *****
 
I added a little cocoa to my icing to make a chocolate Royal Glaze, and then iced the cookies.  Some, I sprinkled coarse sugar on to resemble salted caramel, and on some I sprinkled some toasted almond.  And, just for giggles, I had to make one look like it was the "gross" one of the box... the one that stands out from the rest, and if it were in a real box of chocolates, it would be the last one anyone took, and threw away after a tiny bite out of the corner... : )  To the rest, add some drizzles 'n' stuff.
 
 
*****


*****
 
 
When they're dry, put them in to some mini cupcake liners, and then in a box.  And there you have it! 
 
*Sweets for my Sweet*


*****


Here's to Hallmark Holidays! 
 
Happy Sweetest Day!  


Thursday, October 4, 2012

Coffee Break Giveaway - and the Winner is...


... Vicki Sensmeier!
 
Congrats Vicki - hope you enjoy your new stash - and share pics if you make the Coffee Break set : )
Please contact me with your address so I can get your goodies out to you!
 
Thanks for all of the LOVE you all expressed for not only me, but for Karen's, BRP and PIP.  They are all wonderful people & I really appreciate their donations to this giveaway!
 
See you soon
&
Happy Baking!


Wednesday, September 26, 2012

Coffee Break and a Giveaway!


After a very busy month, I figured I deserve a coffee break.  With donuts.  So, using my new Latte cutter from Plastics in Print (fondly known to the cookie world as "PIP") I thought I would cheat just a little & make coffee and donut cookies.  Pretty simple, except when you are doing a bajillion other things at the same time and decorate your one main cookie all wrong and have to scrape it off and decorate the back of the cookie... Nope, that didn't happen here... ok, so what if it did... (if I was smart I would have made an extra, but I really wasn't expecting to completely ruin it!)  Speaking of which, I used a Boo-Boo stick from Karen's Cookies to scrape the icing off - I love those sticks!  I really like how this set eventually turned out... and in a BRPBoxShop cookie box, too cute not to send to someone who needs a coffee break in life!  I guess I could have done the Starbuck's logo on there but after my icing mishap, I decided not to test my luck...  Here's a quick tutorial, IKEA style - pics only, minus the little guy...


*****
 

So, do you have someone in mind to send a Coffee Break box to?  I thought so... that's why I'm going to do a Coffee Break Giveaway!  Here's what you'll get to help you make this set, should you be the lucky winner:


  • a PIP 3.5" Latte cutter, generously donated by Plastics in Print - thanks Patrick!
  • 2 CK icing bottles with couplers and caps, and a pack of Boo-Boo sticks, generously donated by Karen's Cookies - thanks Mike & Karen!
  • 6 (7X4.5X1") white window cookie boxes & lids, generously donated by BRPBoxShop - thanks Connie!

...AND some treats from yours truly...


  • #1, #2, #3 and #4 Wilton tips to go on those icing bottles
  • Tip Covers to, well, cover your tips
  • a 3-pk of circle cutters to make the donuts
  • 3 bottles of  AmeriColor Gel paste in Bright White, Chocolate Brown and Soft Pink to color your icing
  • Cookie bling - Jimmies and Non-Pareils to top off your donuts
  • a bottle of Wilton Glycerin, should you like to try making my Royal Glaze
  • ...and last but not least, a $5 Dunkin' Donuts gift card, to give yourself a coffee break while your cookies are drying ; )

*****
 

4 Ways to Enter:

  • Post a comment here on my blog - feel free to say something sweet about Karen's, BRP, PIP and/or yours truly;

  • Post a comment on my Facebook wall - make sure to mention this giveaway;

  • Follow my blog.  (If you follow by email, post it to tell me since I can't tell that you're following.  If you follow by Google, I can see that, and you get an automatic entry);

  • Like my FB page, and post on my wall that you're a new fan from my blog.
 
*****
 

Enter thru Wednesday 10/3, winner will be posted by 10/5  - good luck!
 
*****
 
And be sure to visit Karen's Cookies, BRPBoxShop and Plastics in Print for your cookie needs!

*****
 
Ok, I'm finally off to my coffee break!

Friday, September 21, 2012

Pressed (for time) Flowers


One of the reasons this mini flower is among my favorite go-to cutters is that I can make some pretty flowers, pretty quickly.  If I have a lot of cookies to do things on my plate and need something sweet and quick, these flowers are it.  And it's not like they are something I just "threw" together - remember, there's still the making of the dough, the icing, the cutting, baking, etc. that goes in to the whole process.  So, if you are the recipient of these flowers, although my schedule may have been crazy, and I was pressed for time, know that lots of love went into them,  and I wanted you to have something pretty from me : )

*****
 
So, you've made the dough and icing, & cut and baked your cookies.  You will need 2 colors in Royal Glaze consistency (somewhere between flood and piping, where it will settle on its own, without any help) - I really like white and yellow for these.  This flower cutter has 6 petals on it which makes things easy.  You are going to flood every other petal, and let those set for 5-10 minutes, more for glazers. (I know, at this point they look really weird, but not for long...)  I did a few dozen here, so by the time I was done with the last, the first was set enough for the next step.  Now, flood the last 3 petals on each cookie.  Since the first petals aren't really dry yet, make sure you don't dig the tip into them when moving your icing around.  (yes, I know they still look weird...stay with me...)  Let them set for 5-10 again, or if you did a lot, the first one should be ready.  Take your second color and holding the tip straight over the center about 1/8" above the cookie, squeeze straight down until the center is big enough to "separate" the petals.  The tip will eventually be "in" the icing as you are squeezing - that's fine, don't move the tip and it will build a nice big puffy circle.  That's it - you're done!  Let 'em dry, then pack 'em up for someone special! 


 *You may notice on the dried cookies that the centers of the petals are slightly recessed - I actually do that on purpose because real petals are actually like that. The way I flood to get this is to outline the petals with a little more pressure than I flood the centers - if I leave the icing to settle on its own, they just dry that way.*
 
 
*****
 
Some of these are going to a a very special friend of mine who recently lost Cupid, her best buddy in the whole wide world of almost 15 years, and I wanted to cheer her up.  And because she made me the sweet platter I have the cookies on at the beginning of the post...

 
I hope she doesn't see this post before she gets the cookies, but if she does... Hey, Jodi - watch for these, they should be there by Monday.  And don't worry, you don't have to eat Cupid - I won't mind : )  Love you girl!
 
RIP Cupid.

Thursday, September 13, 2012

Shipping Discovery! (plus tutorial)


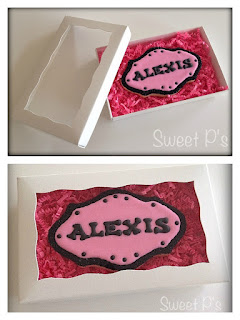
I just love making small cookie sets for gift-giving!  Nothing too big, just enough to tell someone thank you, or Happy Birthday, or simply that you are thinking of them.  I used to package them in cello bags with a cute ribbon, until BRPBoxshop came out with their new cookie boxes.  The small size, I have found, is just perfect for these little sets!  With a nice sized scalloped window, and using colorful shred to nestle the cookies in, they couldn't be more perfect.  The problem with these small sets is that some people want them shipped.  And we all know that packaging for shipping isn't usually a pretty thing, since you can't really present the gift box as-is - the cookies will slide around, and they need extra cushion to prevent breakage, plus the cost of shipping!  Welllll... yesterday I made a major discovery - the small cookie boxes from BRP fit perfectly into...are you ready...a SMALL FLAT RATE Priority shipping box!  I thought nothing would ever fit in those dang small boxes!  And I thought for sure I would have to ship this Mickey & Minnie gift box in a medium Priority box, which is twice the price.  Not so!  And the small flat rate boxes are only $5.35 ($5.15 if you print your labels online.) AND the boxes are free.  AND they will even pick it up at your door!  I WAS JAZZED!  So I thought I'd show you, since I know you're shaking your head and rolling your eyes at me - just like you I have never actually fit anything into those small flat rate boxes.  Which is why I had them laying around - I brought them home, and was never able to actually use them!
 
*****
This is all you'll need:
small BRP cookie box, small flat rate priority box,  a bit of tissue paper (I recycle mine from my shipments from Karen's Cookies - thanks Mike!), a bit of shred, a bit of bubble wrap (also recycled), tape, a piece of sturdy cardboard (not shown - sorry - but also recycled, from another Priority box :) and, of course, your cookies.
 
 
*****
Take your tissue and line the box with it.  Place the cardboard on top - it should be smaller than the lining of the box.
 
 
*****
 
Take your wrapped cookies and make inside-out tape rolls/loops (so the outside is sticky) and stick them to the backs of your cookies.  Place & stick the cookies onto the cardboard so they will show nicely thru the box window.  Note I covered my cardboard with yellow cardstock to make it blend better (unless you are using, say, white shred : ) - you could also use cute themed scrapbook paper.


*****
 
Stuff shred around the cookies - where there is packaging, put some shred under to make it look like it's sitting in shred - but do not put shred between the cookie and the cardboard - it will defeat the purpose!  You want the cookies sitting right on top of something that will not bend.  Also, stuff extra shred along the outside where you can - build it up as much as you can so that it will be right up on the inside of the lid when closed - this makes it so there is no movement of the contents of the box.  You can add a little card, tag or your business card/sticker on it (again, sorry, forgot the pic!)


*****
Take a piece of bubble wrap (the small bubbled kind) just big enough to cover the top and sides of the cookie box - no need to cover the bottom since a) there is already cushioning inside the bottom of the cookie box and b) this makes a perfect fit inside the priority box - with NO MOVEMENT!
 
 
*****
I wish you were here to shake the box - nothing moving in there at all!!!!  And in case you are wondering if this is really enough cushion... I normally ship cookies "floating box-in-box" style, but not with these.  This shipping box is small, and unlike the larger boxes, its small size makes it much sturdier!  I couldn't push it down in the center at all.  You may, however, want to add some "FRAGILE & PERISHABLE" labels, and maybe give a few cookies to your postal carrier...
 
 
*****
Here is a plaque cookie that I made using a Plastics in Print (PIP) cutter - fits sooo perfectly in the box!  Next time I would add a few minis to this one...


Here is another plaque that fits just right...
 
 
  Also, my cupcake and candle gift boxes are in this box as well. (not the best pic sorry!)


*****
 
And there you have it : )
 
*****
 
As I mentioned in a few previous posts, there is a GIVEAWAY coming...including some items that were donated by three of my favorite vendors...here's a hint...these vendors were all mentioned in this post...and USPS is not one of them! Watch for it in the next few weeks, or days, depending on what life throws at me!
 
*****
 
Happy Baking & Shipping!