Pages

Monday, December 7, 2015

A Little Background


So, I was looking something up on my blog the other day & had to do a double take.  Ummm has it really been almost a year & a half since my last post?  Nah, I've had so many ideas, written notes, taken pics...  Ugh... yep, it really has been that long... Well, I can't say that life has been uneventful - new job, oldest daughter graduated & is now away at college, new puppy (poor Sadie crossed the Rainbow Bridge last September), to name a few. When the Cottage Law didn't pass last year, cookie-ing slowed down a bit, and everything else kept going at full speed ahead!  So before I blink and another year goes by I wanted to share  a trick I *think* I came up with... I belong to a lot of cookie groups and haven't seen this one before so...for the sake of a long overdue blog post, let's just say it was my idea : )

If you saw my last post, "A Two-Fer", you will notice that there was a background behind my cookies:


Another favorite background of mine were used with these cookies:


What I had done was print a design onto card stock, cut it out, slip it I to a treat bag, and slip that inside of my cookie bag.  For one, I love having a cute background.  And two, I like having a backing to "support" the cookies.  And I had to do it that way since I didn't want the cookies touching non-food-safe ink from my printed image.  Or perhaps having butter bleed onto the image.  Or even due to the fact that the paper may not be food safe.  So regardless that it cost extra for the bag, and took extra time to put the printed image in, and then squeeze the bag into another bag, I did it, all in the name of packaging.

If you don't mind straight white, BRP Boxshop now has grease proof cookie cards that you can cut to size - which I love! Or there's candy padding, but that's a little pricey for me... Or you can continue reading my story...

Anyhoo... the other day I was looking thru my stock of bags to see what I needed for some upcoming cookies, 'cause I wanted a background and therefore would need extra bags.  Yep, a 25-mile round trip to Michaels it was gonna be : /

Feeling tired just thinking about the ride, and after having made a big dinner, later that day I was looking for the lid to an empty yogurt container to use for leftovers from said dinner (trust me, this is going somewhere...)  Anyway, I couldn't find the lid, so I grabbed my Glad Press'n Seal.  Which I never have because I used to hate how it left little tiny dots on whatever I was covering...but which I know a lot of you have, what with icing bullets being so popular and all.  But I did have a really old roll of holiday Press'n Seal way back in the drawer that I use on rare occasions such as this.  And as I'm using the Press'n Seal, and sealing the excess down the side of the container, I thought to myself, hmmm... you can see thru that pretty good.  It's not completely clear but pretty clear nonetheless.  And then, that's when the lightbulb went off...  I grabbed the nearest paper item, which happened to be a Christmas sale circular, and stuck some Press'n Seal over it.  And you know what?  It worked!  It stuck to the paper, and I can see thru it!
And I can now make my own food safe backgrounds, and don't have to put them in bags inside of bags anymore!  I used enough to cover an 8.5x11 printed card stock, and then I used my paper cutter... yes, my paper cutter... to cut them into smaller sizes!  Awesome sauce!  And I covered regular printed paper from Michaels and used that to photograph these cookies... sorry, it's all I currently have on hand : ) I'm excited that I can just wipe it down!  And the fact that it isn't 100% crystal clear?  Well, the slight dulling of the paper makes a nice muted background for your cookies to stand out & be the star! And, I don't care, I just cut my cost ($.04/sqft for Press'n Seal  vs $.05/bag) and packaging time by a LOT, as well as increasing my opportunity for cute packaging by a MEGA-LOT : )

*please excuse my photography... these pics were taken in the weeee hours of the morning, and the lighting is poor...


with Glad Press'n Seal


without Glad Press'n Seal


Just think of the backgrounds... not only scenic but "SAMPLE" or "YOUR LOGO" or "BABY'S NAME" or "INGREDIENTS" or "GLUTEN FREE" or "HOMEMADE" or any theme at all!
Or, just cover white or colored paper for a plain background : ) OR take your favorite Christmas wrapping paper, glue stick it to some card stock, and cover it for holiday cookie backgrounds!
But wait!  There's more!  You could even line your flat platters or trays!  And in a side-by-side slide test, cookies slide 25% less than without!  No seriously... Look!


Cookie on Glad Press'n Seal (left) slid 25% less
than on non-coated paper (right)
in a side-by-side slide test

Oh and BTW and a new roll of non-holiday Press'n Seal was purchased and they must be new & improved - no little dots left behind! Double bonus!

So, I hope my idea was a good one... and hopefully it won't take me another year and a half to post a new one : )

Happy Holiday Baking!


Sunday, May 11, 2014

A "Two-fer"


We all know that "the holidays" refers to Thanksgiving through New Year's and most would consider that to be the busiest time of the year.  Until a few weeks ago I would have agreed wholeheartedly.  But May is the start of Communions, graduations, weddings (and anniversaries!), Teacher Appreciation Week and Mother's Day, to name just a few.  So I've been busy, busy, busy...  In order to combat some of the stress, for the bulk of Teacher Appreciation Day and Mother's Day, I combined the two and made the same sets for both.  A Two-fer!
 
 
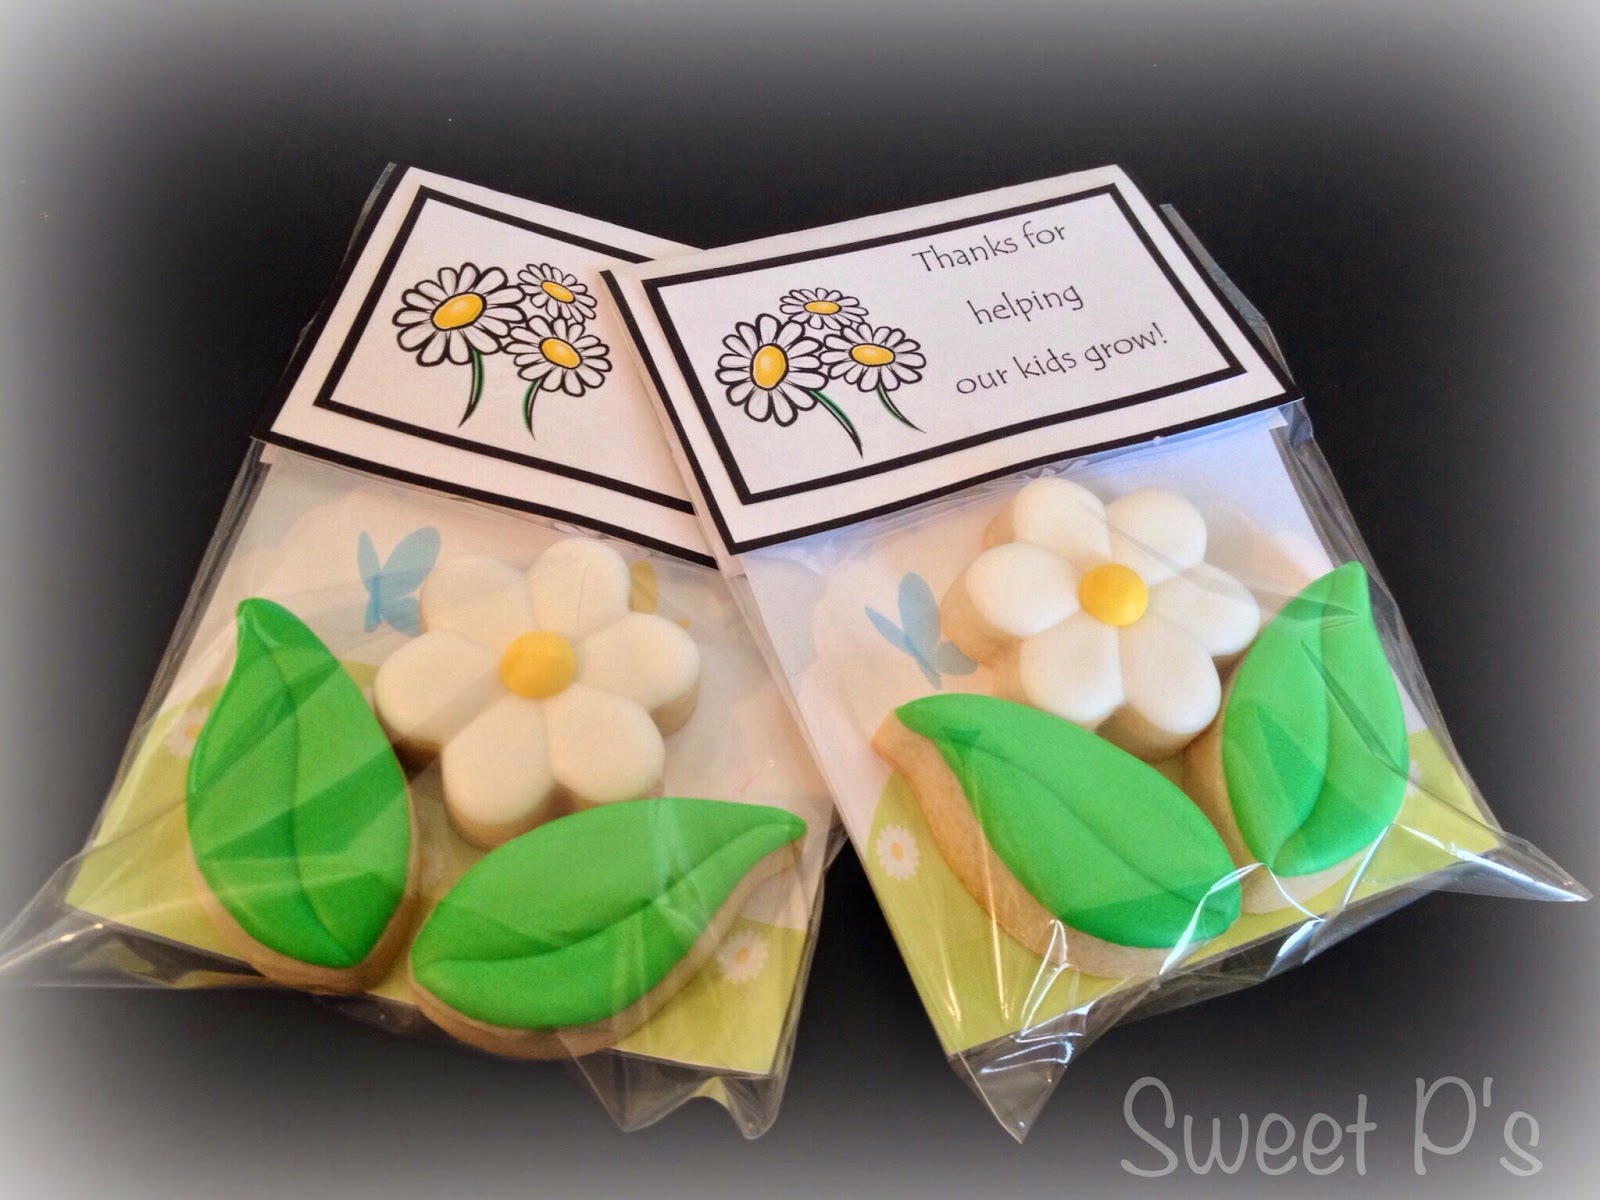
I made a background with some clip-art, printed out a ton of them, painstakingly cut them out to fit treat bags, bagged them, and then stuck those into a second treat bag of the same size.  (I bagged the background separately so that the cookies would not sit directly on the paper.)  I mixed dough and icing, cut, baked, and decorated around 20 dozen cookies - daisies and leaves - and made these sets, changing the labels for each occasion.  (Instructions for the daisies can be found here.)


"Thanks for helping our kids grow!" - Teacher Appreciation

 
I know these weren't my most creative cookies ever, but time was not on my side this month and I was more than satisfied with the end results. 
 
Have you ever done any two-fers?
 
Happy Teacher Appreciation Week to all the hard-working teachers that help our kids grow!
 
And Happy Mother's Day to my mom, my mother-in-law, my sisters-in-law and to all of the other wonderful moms out there!  Have a beautiful day!


Monday, April 21, 2014

A Royal Slacker


It seems that every year around mid-April that my brother emails me to ask if my daughter still plays on Club Penguin.  He pays for her renewal every year, bless his heart, because I find it a little hard to justify the $60 yearly "dues" for an online world of penguin play!  Which reminds me that it's almost my birthday (this week : ) and that I had planned to do a post on my daughter's Club Penguin Puffle birthday cupcakes... her birthday was in January!  I've been a slacker, and I'm sorry!

Anyhoo, her birthday is the week after Christmas, so when she asked if I could make 3 dz Puffle cake pops I was like, no way am I going to have time for that!  How about some cupcakes?  I promise they will be cute...  Ok, mom, sounds good!  Thank goodness, 'cause cupcakes are way easier & quicker to do than cake pops or cookies : )

I decided to do royal icing transfers for the toppers.  They are a time-saver on all accounts - you can make them weeks, or even months ahead of time, and it makes decorating go so quick, whether it's cupcakes, cookies or cakes.  I found an image I liked on Google images, sized it on my PC, and copied rows and rows of them onto a single sheet to make a template.  I have started using page protectors for my transfers (the mid-thick ones - too thin and you are asking for trouble with wrinkling, and too thick you may have issues getting them off.).  Just print out your template, and slide it in the page protector.  I got a package of 250 page protectors at Costco for $11.50 and if you clean them well after (usually a good wipe down will do) you can reuse them.  But being the slacker that I can be, a lot of times I just toss them out... Call me a spendthrift, but I used one sheet to make more than 36 transfers, so that's around $.001 per transfer.

Tip: I always add a piece of card stock or two behind my templates to make them easier to move afterwards, or so that they don't blow around should I choose to dry them in my dehydrator.  I tape them together, making a little tape-handle that sticks out of the page protector so that I can slide the sheets out easily.  This also comes in handy when I need to pipe more than one sheet of the same transfers - just slide it out, and into a new page protector, rather than printing more than one sheet.

As with all royal icing transfers, I rub a very thin layer of Crisco shortening on before piping.  I do this before each row, so that my hand isn't laying in shortening beneath the row I'm piping.  I learned this the hard way...  Oh, and always, always make extras!

Day 1:
I piped the eyes - a whole sheet of them.  I used the wet-on-wet-on-wet technique for the pupils.

(If you made your eyes early enough in the day, they should be dry enough to do the second step by late afternoon, maybe even earlier.  You could even use your dehydrator on low to speed up dry time, or to make them shiny.  I just opted to wait til the next day to finish them.)


Day 2:
I removed the eyes, and using the same page protector sheet, flooded the Puffles, dropping the dry eyes on the wet Puffles with my handy-dandy offset tweezers (I bought them specifically for dropping transfers and other bling onto wet icing.). I like the offset ones so that you can hold your deco flat & you can better see where to drop it on.  After reaching the end of each row, the first Puffle was set just enough to pipe the smile on.  (If adding anything more than a simple detail like a smile I would wait for the base to dry more to avoid crushing the freshly iced base.). Repeat, repeat, repeat...


Day 3:
Bake cupcakes.
Ice cupcakes.
Drop Puffle onto icing, add sprinkles.
Put in cupcake containers & hope they make it to school ok after a trip on the bus.  Think better of your decision, and drive daughter to school with her precious cargo.  Curse yourself for making cupcakes (instead of sending in birthday pencils and stickers) after she drops them upside down before ever making it to her classroom not 5 minutes later!  Luckily, kids don't really mind a messy cupcake : )


Another tip:  if you want to save time, and are brave enough to pipe the eyes directly on your Puffles (or whatever details on whatever you are making), when you make your template, do one or two rows around the outside of the page instead of covering the whole sheet.  The bottom layer will need to dry a bit before adding the details (unless you want a wet-on-wet look) and if you cover the whole sheet you would just smoosh them with your hand when going back to add them.  (and yes, I learned this the hard way as well!)

Whew!  Anyway, after the transfers were done, I thought about putting them on cookies instead, but adding a day for making cookie dough, chilling, cutting, baking and yet an extra day for dry time didn't sound all  that appealing : ). After all, I was still recovering from Christmas!

Also, they look super cute in a candy dish - I mean, who doesn't eat their leftover royal icing transfers?


*Update:  It seems that my IT Guy (aka hubby, but not by trade : ) was able to fix my Blogger issues...knock on wood...).  If the format still looks weird to you, let me know - he's on call : )  Thanks honey!


Thursday, October 17, 2013

Let's Weigh In!


You know, 'cause the holidays are coming up and we want to be sure we eat lots of veggies and aren't overdoing it with all those yummy treats!  Just kidding... I don't think you'll ever see me mentioning my weight on my blog for all the world to see! (not to mention any before-and-after pictures!)

I'm talking about ingredients - powdered sugar to be exact.  As many of you know, my Royal Glaze recipe calls for 2# of powered sugar, which has been a no-weigh no-brainer for me since Domino pure cane 10X powdered sugar comes in 2# bags.  Easy.  And has been a no-brainer, until about a month ago.  When I had a really, really runny batch of it. I NEVER have issues with this icing (ok, once a few years ago but I was still a newbie decorator & still developing the recipe, so I'll never really know what went wrong that day...). I have made TONS of this icing, and it has always been a dream to use.  Some who have tried it have said they don't think it came out right - I always assumed it was the meniscus issue - above the line, below the line (when measuring the water the meniscus is that curve of liquid at the top - I always let the bottom of the meniscus lay on the bottom of the measurement line).  Until about a month ago.  When I had about 20 dozen cookies needing to be iced.  I nearly freaked out, I tell ya!  I thought it was my new mixer - which made me sad, 'cause I really really love my new 7qt Pro Line KA... and making a double batch of icing seemed surreal and totally exciting...

Anyhoo... after working through my runny icing it came time to make another batch.  I have been starting to weigh ingredients for my cookie dough since I can make triple batches with my new mixer, and who wants to sit and measure 12 cups of anything when weighing is so quick and consistent!  Which made me think...my last batch of icing was definitely NOT consistent with all previous batches, so just for giggles, why not weigh my powdered sugar?  (Even though it comes in 2# bags... )  To my surprise, that 2# bag of powdered sugar did NOT weigh 2# at all - it only weighed 31 1/2 oz!  And the bag itself weighs 3/8 ounce, so there was only about 31 1/8 ounces of sugar - that 7/8 ounce deficit is the equivalent of about 1/4 cup!  Which would result in (drumroll please...) runny icing!   (And on that double batch of icing I made, would have been a whopping 1/2 cup's worth!)

I was flabbergasted (to put it nicely)!  Since we were moving and I was aware that our only close store does not carry Domino powdered sugar, I stocked up before the move.  I had 6 bags on hand, and I weighed them all. Not one of them weighed 2#.  They ranged anywhere from 31.125 oz to 2# 2oz /34 oz (which would result in thick icing) - not acceptable, so I placed a call to Domino.  I told them my findings - gave them the weight of each bag, as well as the production codes from each bag so they could research.  I was told that I would be sent coupons to replace the 6 bags, as well as receive a follow-up call from quality control.  I wanted to know, what should I really expect from a 2# bag of sugar?  I would think, well, 2# of sugar!  But, I wanted to hear it from them.

A week went by and I received coupons to replace 4 of the bags - not sure why they shorted me, but I wasn't calling them for free product, I just wanted to know the scoop.  I use a LOT of this stuff, and NEED it to be consistent.  Another week went by, and I still hadn't received any phone call.  So I called back, and got a canned "I'm so sorry for your inconvenience - I will note the file and have someone call you back..." blah, blah, blah...   Here we are, a month later, and I have not heard a peep from them.  I assume that means either a) they think I'm a nutcase or b) they are as baffled as me.  I'm hoping they are re-calibrating all of their scales so that the next bag I buy actually has 2# of sugar in it!

In the meantime there are several solutions.  One of them NOT being switching my brand of sugar, because I really do prefer it for my icing.  But, if I want a slightly runny batch of icing (like if I'm going to do a lot of wet-on-wet designs, or large cookies needing a lot of flooding) I can use the bags that weigh less.  When I want a slightly thicker icing (say, for a lot of detail work) I can use the bags that weigh more.  OR I can just weigh the sugar again and add or subtract enough from my baking-bucket to make 2#.  It's a lot easier than trying to guess how much more/less water to use.

(Or you can use plunger cutters & go un-iced if you get frustrated or want to save some calories - see veggies above : )

I also no longer wonder why so many people can get so many different results with the same recipe.  And am glad to know that it isn't necessarily "user-error" (being that I thought I must have qualified for that club on more than a few occasions... : )

In the spirit of all of this madness, I was wondering - do you all weigh your powdered sugar?  Or use the 1# box or 2# bag?  If not, give it a try - does it weigh what it should?  Leave a comment and I will  SHARE MY SUGAR with you!  I will be giving away 3 of my coupons via random draw from your comments on Tuesday morning, so leave your comments by Monday 10/21.

Happy Baking!  (Or weighing!)

Tuesday, August 20, 2013

What's Been Movin' and Shakin' Lately?


Me!  That's what!  I don't know where the last 5 months have gone... ok, actually I do... We just moved from a Chicago suburb with a population of 75,000 to a small, quiet little Madison WI suburb of 12,000 (small as in, my directions often involve making turns at cornfields, and warnings to watch out for the tractors crossing the road!). Definitely a change of pace - Piggly Wiggly doesn't really carry my favorite ingredients, and craft stores are no longer conveniently a mile or two down the street (country road, whatever!).  Makes things a little difficult, but the trade-off is well worth it.  I LOVE living here!  (I especially love my new Wolf oven...!)


Anyway... I just wanted to apologize for my extended absence - we found out in March my hubby was being transferred here, and between fixing up & selling our house, finding & buying a new one, and all the fun involved in moving, things have been a bit crazy.  But I'm finally finding a little more time each day to get my baking groove back on.  YAY!

~~~~~~~~

So, in our crazy days of no-time-to-bake, my kids picked up some of those frosted animal cookies - I was SO grossed out by what came out of the package, I just had to make it right.  See below:


I mean, what are those store-bought blobs supposed to resemble, anyway?  Homemade ones hands down look better (even though I went a little too sprinkle happy!), taste better and, aside from the mixing (dough), rolling, cutting, baking, mixing (icing), bag filling and cleaning up, they are super easy-peasy to make:  


(that's an elephant...but you already knew that...)
 
So, if you are already doing all that other stuff anyway (you know, the mixing (dough), rolling, cutting, baking, mixing (icing), bag filling and cleaning up)  there is no excuse to EVER buy those crappy iced animal cookies EVER AGAIN!  And they are sooo perfectly cute for a baby shower or gift!  Even change up the colors of your icing or sprinkles - I personally love Wilton's Spring mix : )
 

I hope to be all back to "normal" soon - baking, posting, giving things away... in the meantime enjoy the rest of your Summer!


Wednesday, February 13, 2013

Isn't it Romantic?


What is more romantic than champagne and chocolate covered strawberries? 
Probably lots of things, but this Valentine's Day, these cookies fit the cookie-jar : ) 
Or gift box... whatever... you know what I mean!


With the addition of some cocoa powder to my icing, these strawberries can truly be called chocolate covered.  (Sorry, nothing fancy in the champagne : )

*****

On another note, with talk of LilaLoa's February Sketch It! Challenge, I agree it's a good idea to sketch your cookies designs before you decorate. 

 
(Ok, my sketch doesn't count - this is an app-generated sketch.  My real sketches were really too embarrassing to share online - I obviously ice better than I draw : )

*****


Oh, and gotta give a little shout-out to DH - I love you C-Dog!

 
*****
 
Happy Valentine's Day!
 

Monday, February 4, 2013

Spring Cleaning Winners...


Thanks to all who encouraged me to keep up with my
 
By random draw, the winners are...
 
Catrinkas
*
Kris from So Cute Cookies
*
Michele from Cookies by Michele
*
Debbie from Sweet Creations by Debbie
 
Please send me your addresses ASAP & I will
get these out to you in the next few days!
 
Congrats & thanks for helping me clean!


Tuesday, January 29, 2013

Spring Cleaning!


Typically, "normal" people do this in, well, Spring.  But cookiers seem to work a season ahead at all times - Christmas cookies by Thanksgiving, Valentine's right after Christmas, 4th of July right around Memorial Day... if you are a die-hard cookier, you know it's true!  And since I was a little late on starting Christmas cookies, I'm all off kilter.  The holiday season, and all that comes with it, including everyone being home for almost 3 weeks (with sick kids to boot), Christmas decorations needing to be placed and then packed away, and school not starting until the second week of January, I have fallen way behind.  On everything.  And I can't work in a cluttered environment - I get my groove on when there are no distractions.  So I figured I would jump ahead a little bit and start my Spring cleaning now, so that I'm ready when Spring actually does arrive.  We're talking full-on assault: tear-the-house-apart, room-by-room (including kiddo room makeovers), closet-by-closet, cabinet-by-cabinet, fridge, freezer, baking supplies...  yep, even my baking supplies are getting the once-over.  With that said, I came across some brand new cute stuff that I want to give to some of you.  They are Valentine's themed, so just in time!  I didn't mention "giveaway" in the title 'cause it's a test to see who actually reads my blog they're nothing major, but they are majorly cute!

Just post a comment - say hi, wish me luck on my cleaning, tell me to get my butt in gear & post some cookies...whatever you like!  (don't get me wrong - I've done a bunch of cookies this month, just nothing particularly blog-worthy : )  But that's going to change as soon as I'm done, so help me out & take these cuties out of my house!)

There are 2 oven mitt & towel sets, a double pack of kitchen towels, and a set of 4 placemats.  Aren't they cute?  I just love cupcake-themed stuff : ). So 4 items to give away - just post a comment - winners will be chosen at random & posted on February 4th so I have enough time to get these to the winners in time for Valentine's Day : )


Good luck, & happy baking! 
(or cleaning... whatever makes you happy!)


Monday, December 24, 2012

Happy Holidays!


I know I've been a little light on posts lately - been busy with cookies most of the month...

...lots of cookie platters...


...and cookie gift boxes...
 
 
...and cookie favors...
 
 
...and other cookies like Snickerdoodles, Merengues, Pecan Tassies, Chocolate Chip, Peanut Butter Kisses, Gingerbread, Gingerbread Houses, and even Pumpkin Treats for the dog (her fave)...
 
...and braving the grocery store for Christmas dinner fixins...
 
...and finding time to squeeze in some Christmas shopping here and there...
 
...and in the midst of all the running around this time of year, it's time for some quality family time...
 
...and to send a prayer for those whose year may have held sadness through loss or tragedy...
 
...and to count our own blessings...
 
Wishing you Peace and Happiness during the Holidays and throughout the New Year!


Monday, December 17, 2012

Wednesday, November 28, 2012

Stamp of Approval?


A long, long time ago (ok, about 2 years ago) I was a stamper.  Making cards.  Lots of them.  With the bajillion stamp sets I had accumulated over time.  I love making cards, always have.  But a million paper cuts later I decided that I didn't want to do it in volume anymore, and I found a sweeter hobby - baking.  To make room for all of my new baking toys (yes, I said it!) I knew that I had to scale down the stamps.  A lot.  Almost all of it.  Some of it left home via garage sale, some via cookie friends (Anita...Jackie...) and most of the rest are sadly sitting on eBay right now.  But some are sitting with my baking toys... clear stamps that have been said to be ok for use on food...(brand new, never been used ones, of course...)
 
I just happened to have some white-iced cookies laying around, you know the ones... they are so old you wouldn't consider them food anymore, but they are perfect for playing & trying new things... and with food coloring as the paint I was ready to go play!
 
I didn't have any luck getting regular Amerigel to work but I have read about others using airbrush colors on stamp pads to get the job done.  Well, for all of my stamp supplies, I did not have a new, uninked stamp pad laying around so I just painted the color on new, unused clear stamps with a paintbrush.  First I stamped it on some paper to a) make sure it worked, and b) to get the excess color off.  Then, I stamped the cookie - not too shabby!  The clear stamps are nice, because you can see exactly where it is going on your cookie.  (You can see I had to fit the stamp to the cookie, since I didn't make the cookie to fit the stamp... and being able to see where you are stamping is a tremendous benefit!)


Then for fun, I used icing to go over the stamped images and add accents.  My 15 year old daughter prefers the stamp-only-vintage look (the one at the top pf the post) but I kinda like them with icing too.


I tried some other stamps but apparently not all are created equal - on some the color just pooled around the stamp.  One of these days I will play around some more & see if I can figure it out.


So, does cookie stamping get my stamp of approval?  Maybe... the jury is still out on that one...
 
 
Before I go, I must send a shout-out to Barbara (lov2bake)
I thought of you the whole time I was doing these!
 
Happy Stamping!


Thursday, November 22, 2012

Happy Thanksgiving!


I hope everyone had a safe and happy
Thanksgiving,
and that you were able to take some time
to reflect on all there is to be thankful for...
Enjoy the holiday!


Tuesday, November 6, 2012

Election Day 2012


I pray that whatever choice America makes today
that it is the right one!


Thursday, November 1, 2012

Corny, I know...


Hope everyone had a safe and happy Halloween!
 
(...and lots of prayers for those affected by Sandy...)


Sunday, October 28, 2012

A Pressing Matter...


***************
 
 
Once again, I had purchased another plastic impression cutter that looked too cool to pass up.  The ebay app for iPad makes it just too easy to make quick purchases.  Without giving myself time to think twice.  Whether or not it was deep enough for my 3/8" thick dough.  Which it wasn't...


***************
 

So rather than just admire the cutter taking up space, or roll my dough thinner (gasp...never!), I forged ahead and, although not my method of choice, pressed the cutter down into the dough to make an impression and then hand cut them.  Make sure to press enough to get all of the details.  A little time consuming, but really, I had no choice.  If the shape was a little more geometric, I could have used a square or round cutter, but apparently that's something else I overlooked in my haste...  Hand-cut dough isn't as pretty or clean but as you can see in the bottom right picture, the baked cookies don't look too shabby!  I also sometimes do this with regular (not impression) cutters - like letters.  Cut squares, circles, whatever shape you like, then take your cutter & gently impress it into the dough, cutting maybe 1/3 of the way into the dough, and it will leave an impression for you to decorate over after baked.  Or you can use it for cutters like, say, giraffes, that tend to break at the neck - simply impress them onto maybe a rectangle & ice the background in a solid color around the giraffe. 


*************
 
 
And the impression stayed nice and clean so that I could outline the sections before decorating.  Don't add small details like the eyes and mouth before flooding - they will get lost.  They are easy enough to add later.  (Although I guess I should have peeked at the cutter 'cause I did my mouth a little differently... oh well, no biggie : )  Depending on the size of the areas you will be icing, you may want your icing a little bit thinner for flooding.  These were a pretty good size so I was lucky : )  You may also want to outline again after flooding, like if you go over your outlines a little... like I did... Luckily they cleaned up nice : )


************
 
BOO! 
 
 
HAPPY HALLOWEEN!